3 Spectacular DIY Wedding Bouquet Ideas
In this excerpt from The Flower Workshop, floral designer Ariella Chezar shares instructions for gorgeous flower arrangements.
By Ariella Chezar

Courtesy of The Flower Workshop
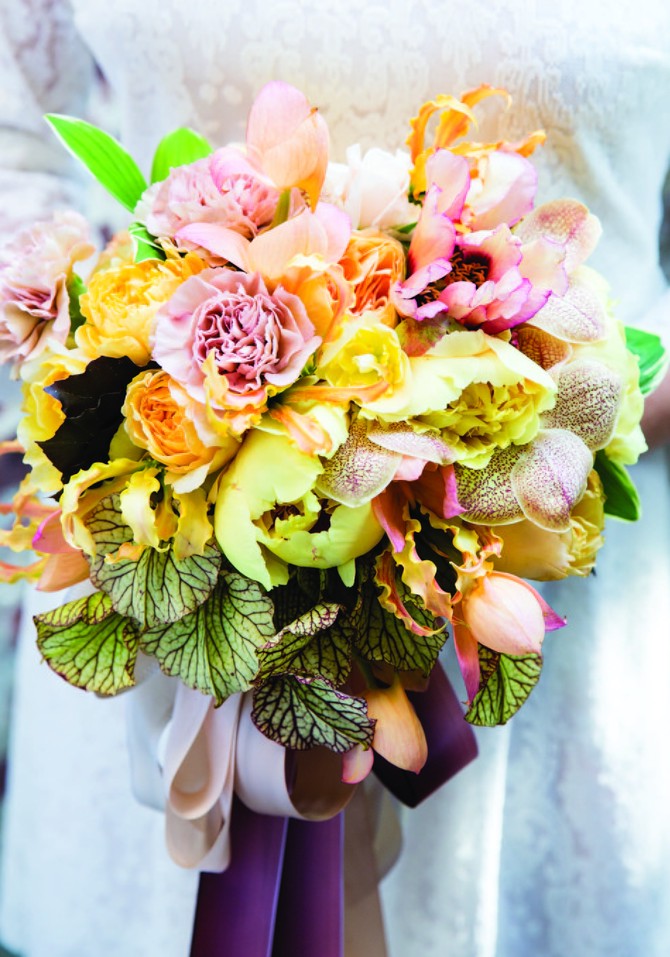
Bridal Bouquet in Shades of Peach and Yellow
Season: spring, summer
Once you choose a basic color—in this case a yellowy peach—search for a variety of blossoms that fit this category. The challenge is to find flowers that take your basic color and run the scales with it, from taupe-yellow to butter, from gold to cream, from citrus to speckled.
It’s particularly exciting when you find flowers that use the same color in a variety of ways. In this bouquet, for example, the veins of the striking variegated pitcher plant pick up the same burgundy that dots the freckled Vanda orchids and leaps from the heart of the tree peony.
What You'll Need:
- Rubber bands
- Floral tape
- 2 yards each pale pink, mauve, and burgundy ribbon, 2 inches wide
- Straight corsage pins
- Stapler and staples
- 8 variegated pitcher
- Plant stems
- 8 variegated solomon's seal stems
- 3 yellow peonies
- 6 pale pink carnations
- 5 'caramel antike' roses
- 5 champagne roses
- 3 yellow gloriosa lilies
- 3 speckled vanda orchid stems
- 1 peach-burgundy tree peony
ALTERNATE FLOWERS In fall, use dahlias as a focal flower, freesias or snapdragons as secondary flowers, and sweet autumn clematis for a vine. In winter, orchids are a good choice for a focal flower, as are amaryllis.
1. Start with the pitcher plant, trimming the stems but keeping them long so they can be clipped later. These will form the base of the bouquet.
2. Trim and place four branches of the Solomon’s seal, making sure to keep the greenery behind the flowers.
3. Trim the flowers and add them to the bouquet, alternating the roundness of the peonies, carnations, and roses with the leggy petals of the lilies. Check the bouquet in a mirror as you proceed. Add more Solomon’s seal, placing it toward the back of the bouquet. When the stems get too bulky to hold, wrap them with a rubber band.
4. Place the orchids strategically, making sure they fit between the roses and yellow peonies. Position the tree peony at the top of the arrangement so its full glory can be viewed by the bride.
5. Finish the bouquet with floral tape, ribbon, and a bow as instructed in sidebar.
6. Finish the bouquet with floral tape, ribbon, and a bow as instructed on slide 3.

Courtesy of The Flower Workshop
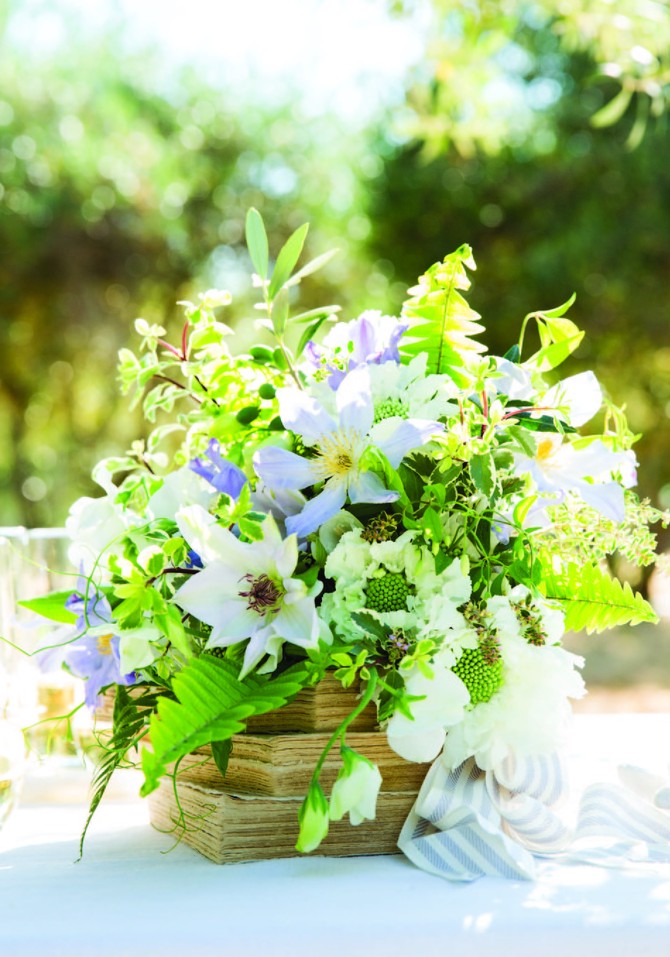
Lavender and White
Season: early summer
“Summer afternoon; to me they have always been the two most beautiful words in the English language,” wrote Henry James. This bouquet is as soft as a summer’s day: a simple arrangement of pale lavender and white highlighted with summer greenery, all of which might be harvested from a backyard garden. What captures the heart is the corona of pale greenery around the small bouquet. The subtly striped ribbon, in pale lilac and white, echoes the floral tones.
What You'll Need:
- Rubber bands
- Floral tape
- 2 yards lilac-and-white striped ribbon, 2 inches wide
- Straight corsage pins
- Stapler and staples
- 8 ferns
- 8 myrtle stems
- 12 pittosporum stems
- 6 lavender clematis stems
- 6 white clematis stems
- 12 white pincushion flowers
- 15 white sweet pea stems
- 4 sweet autumn clematis stems
ALTERNATE FLOWERS Replace the pincushion flowers with white roses or dahlias, the clematis with lavender and white sweet peas, and the greens with boxwood and Solomon’s seal.
1. Begin by assembling the ferns, myrtle, and pittosporum as the base of the bouquet.
2. Layer in the longer clematis stems, both blue and white. Trim some of the clematis to shorter lengths, and alternate these with the pincushion flowers and sweet peas, making sure that the some of the sweet peas stand out from the bouquet like wisps. Add the stems of sweet autumn clematis to the greenery.
3. Fasten the bouquet with rubber bands. Finish the bouquet with floral tape, ribbon, and a bow as instructed in sidebar.
4. Finish the bouquet with floral tape, ribbon, and a bow as instructed on slide 3.

Courtesy of The Flower Workshop
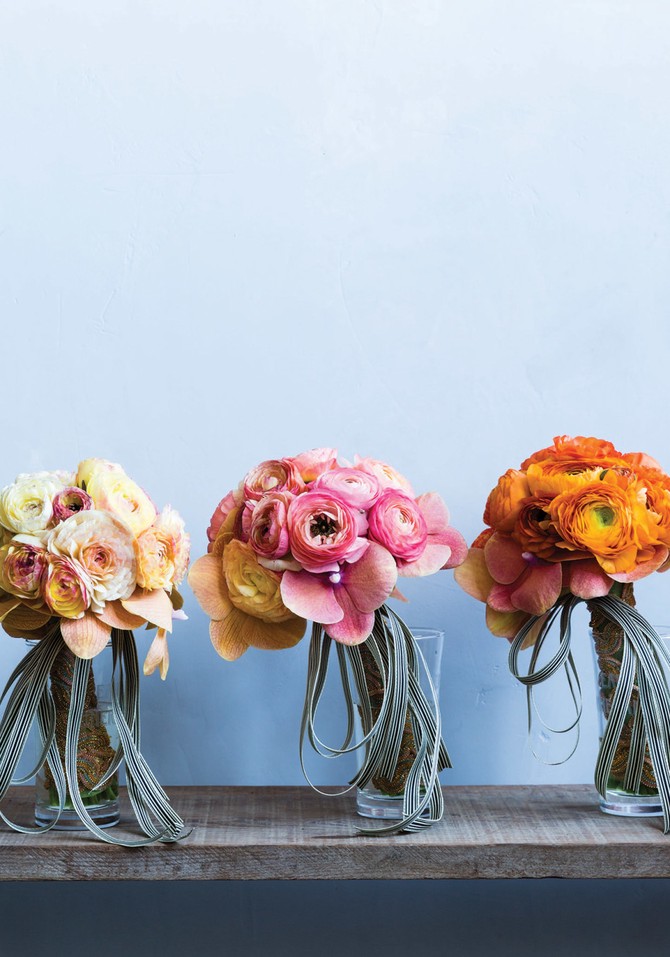
A Trio of Nosegays
Season: spring, summer
Consider the charming nosegay, a small bouquet that, in earlier times, often delivered a message. Called "tussie-mussies" during the reign of Queen Victoria, these bouquets spoke the language of flowers: red roses symbolized romantic love and passion, pink roses implied a lesser affection, and yellow roses stood for friendship. Blue hyacinths meant constancy; purple asked for forgiveness. Bells of Ireland conveyed “good luck.” You can make such small bouquets as graduation or get-well gifts, or for mothers of the bride and groom simply because they are so charming.
What You'll Need:
- Rubber bands
-15 floral stem wires, 20 gauge
- Floral tape
- 1 yard each ribbon in shades similar to the flowers, 1/2 inch wide
- Straight corsage pins
- stapler and staples
- 15 soft peach ranunculus
- 15 pink ranunculus
- 15 copper ranunculus
- 15 phalaenopsis orchid stems, in shades similar to the ranunculus
ALTERNATE FLOWERS Replace the ranunculus with roses or tulips; use iris instead of the orchids.
1. Build each bouquet from the inside out, starting with fifteen tightly gathered ranunculus. Trim and secure with a rubber band.
2. Each orchid has a “nose,” or small stamen, that emerges from the flower. Pinch this off so the flower is entirely flat.
3. To extend the length of the orchid stems, poke a floral stem wire through the base of each orchid. Bend the wire in half so the ends meet, then wrap them, top to bottom, in floral tape.
4. Add five orchids to each bouquet so they surround the core of ranunculus and form the base of each bouquet. Secure them with a rubber band.
5. Finish the bouquets with floral tape, ribbon, and a bow as instructed in sidebar.
6. Finish the bouquet with floral tape, ribbon, and a bow.
How to Wrap with a Ribbon and Add a Bow
Wrap your bouquet in ribbons that are as beautiful as your flowers, and finish by adding a bow made out of loosely looped ribbon. This technique is much less fussy than a standard bow, and it couldn’t be easier.
1. Wrap the stems of your bouquet in floral tape, leaving the bottom 2 inches of the stems uncovered.
2. Wind ribbon around the stems to hide the floral tape, starting at the bottom and working your way up to the flowers. Anchor the end of the ribbon with a straight corsage pin.
3. Select 2 yards of a ribbon that complements the color of the flowers.Make several loose loops, stapling the loops at their center. Cut a V into the ends of the ribbon.
4. Pin or wire the bow to the top of the stems. Feel free to add more ribbon and even combine multiple colors.
5. Place the entire bouquet in a container with 2 inches of water. It can be kept in water and refrigerated for 24 hours.
6. Remove the bouquet from the water right before the event, and trim off the bottom 2 inches of stems.

Reprinted with permission from The Flower Workshop, by Ariella Chezar with Julie Michaels,copyright © 2016, published by Ten Speed Press, an imprint of Penguin Random House LLC.Photographs copyright © 2016 by Erin Kunkel
Consider the charming nosegay, a small bouquet that, in earlier times, often delivered a message. Called "tussie-mussies" during the reign of Queen Victoria, these bouquets spoke the language of flowers: red roses symbolized romantic love and passion, pink roses implied a lesser affection, and yellow roses stood for friendship. Blue hyacinths meant constancy; purple asked for forgiveness. Bells of Ireland conveyed “good luck.” You can make such small bouquets as graduation or get-well gifts, or for mothers of the bride and groom simply because they are so charming.
What You'll Need:
- Rubber bands
-15 floral stem wires, 20 gauge
- Floral tape
- 1 yard each ribbon in shades similar to the flowers, 1/2 inch wide
- Straight corsage pins
- stapler and staples
- 15 soft peach ranunculus
- 15 pink ranunculus
- 15 copper ranunculus
- 15 phalaenopsis orchid stems, in shades similar to the ranunculus
ALTERNATE FLOWERS Replace the ranunculus with roses or tulips; use iris instead of the orchids.
1. Build each bouquet from the inside out, starting with fifteen tightly gathered ranunculus. Trim and secure with a rubber band.
2. Each orchid has a “nose,” or small stamen, that emerges from the flower. Pinch this off so the flower is entirely flat.
3. To extend the length of the orchid stems, poke a floral stem wire through the base of each orchid. Bend the wire in half so the ends meet, then wrap them, top to bottom, in floral tape.
4. Add five orchids to each bouquet so they surround the core of ranunculus and form the base of each bouquet. Secure them with a rubber band.
5. Finish the bouquets with floral tape, ribbon, and a bow as instructed in sidebar.
6. Finish the bouquet with floral tape, ribbon, and a bow.
How to Wrap with a Ribbon and Add a Bow
Wrap your bouquet in ribbons that are as beautiful as your flowers, and finish by adding a bow made out of loosely looped ribbon. This technique is much less fussy than a standard bow, and it couldn’t be easier.
1. Wrap the stems of your bouquet in floral tape, leaving the bottom 2 inches of the stems uncovered.
2. Wind ribbon around the stems to hide the floral tape, starting at the bottom and working your way up to the flowers. Anchor the end of the ribbon with a straight corsage pin.
3. Select 2 yards of a ribbon that complements the color of the flowers.Make several loose loops, stapling the loops at their center. Cut a V into the ends of the ribbon.
4. Pin or wire the bow to the top of the stems. Feel free to add more ribbon and even combine multiple colors.
5. Place the entire bouquet in a container with 2 inches of water. It can be kept in water and refrigerated for 24 hours.
6. Remove the bouquet from the water right before the event, and trim off the bottom 2 inches of stems.

Reprinted with permission from The Flower Workshop, by Ariella Chezar with Julie Michaels,copyright © 2016, published by Ten Speed Press, an imprint of Penguin Random House LLC.Photographs copyright © 2016 by Erin Kunkel
Published 03/14/2016

