5 Clever New Uses for Everyday Things in Your Home
Bring new life to old or unwanted items with these easy projects from
Home Made Simple.
A Modern Rug with a Cozy Secret
This project uses small strips of T-shirts to make a shag rug.
Materials
3-by-5-foot non-slip rug pad
(40) Assortment of adult-size T-shirts—color combination of your choice
Chopsticks
Scissors
Large bowl
Directions
1. Cut your T-shirts into 1-by-5-inch strips and place in a large bowl. The strips don't need to be exact, just approximately the same size.
Expert tip: To cut the strips quicker, cut a 1-inch-wide fringe along the bottom of the T-shirt, cutting up 5 inches. Once the fringe is made, cut off the fringe to make a batch of 1-by-5-inch strips.
2. Take a strip of T-shirt fabric and fold it over the top of a chopstick. Pass the chopstick with the fabric through two holes in any corner of the rug pad, then remove the chopstick.
3. Tie a single knot in the fabric strip and pull tight.
4. Repeat Steps 2 and 3 for adding more strips to the rug pad. For a full thickness rug, place the strips through most of the holes in the rug pad. For a less full thickness rug and to save time, the strips can be spaced a few holes apart.
Expert tip: Start at one end of the rug and work across. You can always go back through at the end and add more strips in between if you want to add more fullness or a splash of color.
A Zen Reason to Watch the Clock
Whether it's stopped ticking or just doesn't fit your space anymore, upcycle an old wall clock into a sophisticated hanging terrarium.
Materials
Wall clock
Straight edge
Marker
Blade
Acrylic plastic epoxy
Sand or potting mix
Small plants/succulents
Trowel
Glue gun
Glue sticks
Directions
1. Dismantle the clock, keeping the Plexiglas and the outer rim of the clock.
2. With a straight edge draw a line through the very center of the Plexiglas and cut with a blade.
3. To create your planter, apply a bead of glue along the inside of the clock rim, apply another bead of glue around the round edge of the Plexiglas and place securely together. Repeat with the other piece of Plexiglas, directly on the other side of the clock rim.
4. Once both of the Plexiglas pieces are secured with glue inside of the plastic rim, fill with sand using a trowel. The sand will serve as a little reservoir for the water once you water your succulents.
5. Remove the succulents from the original pot, lightly pull at the bottom of the succulent to expose the roots, and place inside of the planter.
6. Hang.
An Elegant Upgrade for Your Takeout Utensils
Repurposing some plastic spoons and gluing them to the outside of a LED candle holder allows you to have a flowery art piece in the day and soft lighting at night.
Materials
24 Plastic spoons (pink) per votive holder
Round votive holder
Tin snips or craft scissors
Hot glue gun
Flat white interior/exterior paint + primer spray paint
Flat yellow interior/exterior paint + primer spray paint
Mask
Flameless battery-powered LED candlelight
Directions
Note: These are for LED candles only. No open flames.
1. Using tin snips, cut the handles off of the spoons and discard, leaving only the heads of the spoons remaining.
EXPERT TIP: Tin snips are best to use because they cut through plastic much easier than scissors. If you do not have tin snips, regular craft scissors will work fine too.
2. Use hot glue gun to make a row of spoon heads around the top of the round votive holder. Place the glue at the base of the spoon. When placing spoons in a row they should not overlap each other. Half of the top of the spoon should be above the top of the votive holder.
3. Glue a second row to the votive holder with the second row overlapping the first row of spoons in a staggered pattern.
4. Add a third and final row of spoon heads to the bottom of the votive holder, overlapping the second row in a staggered pattern.
5. Once the glue has dried, turn the votive holder upside down. With the flat white spray paint, dust the row closest to the base of the votive holder by holding the spray paint 6 to 8 inches away and spraying over the top only allowing the bottom of the spray to hit the holder. The bottom row should be white but by the second row there should be very little white paint.
6. Flip the votive holder back over. Spray the top row of spoons with the flat yellow spray paint. Again, the top row should be yellow but the second row should be barely dusted with yellow.
7. Once the paint is dry, place the flameless battery-powered LED candlelight in the center of the votive. *Note: DO NOT USE WITH AN OPEN FLAME
Bookends That Make a Statement
Whether you're a music buff or looking to add a bit of '70s charm to your bookshelves, this project repurposes old vinyl records to create fun and artistic bookends.
Materials
2 used 12-inch vinyl records
1-by-4-foot piece of wood or any straight edge (table, surface, etc.)
Hair dryer
Directions:
1. Set the vinyl record over a hard, straight edge surface with half of the record hanging over the edge. Center wood piece on vinyl record, flush with straight edge surface.
2. Set hair dryer to highest heat, and apply heat to record along the edge of the wood for approximately 4-6 minutes, or until record begins to soften enough to manipulate.
3. Holding the wood piece down firmly on the record, fold the record down over the straight edge until it is bent at a 90-degree angle.
4. Repeat steps 1-3 for remaining records.
Watch the how-to video
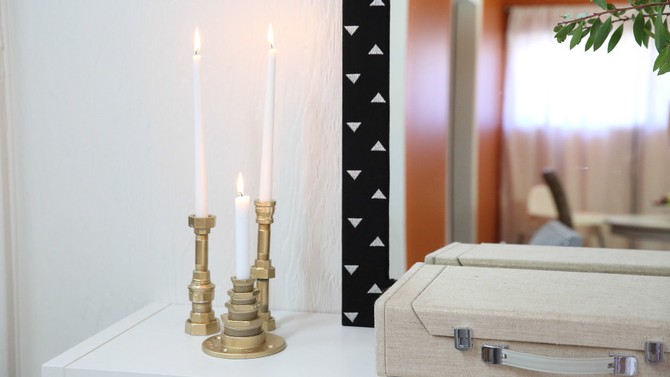
The Polished Alternative to High-Priced Décor
These rustic-meets-glam candlestick holders add a stylish bit of charm to any room and take only a couple minutes to put together. Choose a high shine or metallic paint for an upscale finish (think gold, chrome or black) or matte paint for a more urban look.
Materials
Nuts, range of sizes
Bolts, range of sizes
Pipes, range of sizes
Superglue
Gold spray paint with metallic finish (or color of choice)
Primer spray paint
Candlesticks
Directions
1. Stack and arrange nuts and bolts on the piece of pipe placing a large piece on the bottom (this serves as a sturdier base).
2. Superglue the pieces together. Let dry for 10 minutes.
3. Spray paint the pieces with primer paint. Let dry for two hours.
4. Spray paint with gold paint. Let dry for two hours.
Watch the how-to video
Published 02/12/2018